I am a longarm quilter, and quilt teacher. I would like to share some of the projects that I am working on with you.
Friday, July 26, 2013
Week of finishes
So many times I start a project only to get distracted by another project, a class sample, a customer quilt that needs quilting, but not this week. I made great progress on my UFOs. Such a feeling of accomplishment. As I look at these projects it is just crazy that I didn't just finish some at the time. One just needed a label... done.
The question is how long will it take me to get it mailed off to it's recipients... not the point, the project is done.
Then, there is the class sample that never got quilted... done.
Or the magazine that has sat in my living room opened to the pattern of a quilt I want to make. I keep looking at it and putting it on the top of the pile so that I don't forget it... Done!
Now don't think that my UFOs are all done now. There is a nice big bin under my cutting table with projects that need my attention and a pile of them in my fabric closet. But that is not the point. I take my victories, big or small, when I can get them. ;o)
I hope you all had a productive week and if not, there is a new week around the corner.
Have a great weekend!
Check out the other Link a Finish Friday Blogs.


Monday, July 22, 2013
Adding Dimension to a quilt
I recently co-taught a class with my friend Lisa. We both fell in love with Shabby Fabrics "Blessings of Summer" pattern. It is a great Block of the Month. As we started to review the pattern we noticed that one block had dimension but none of the other blocks. Well that was it, we took each block and tried to see where we could add texture and dimension to the block. It was so much fun! I am going to post tutorials here on what we did. Now remember, we taught this as a block of the month class and it was great to see how creative folks could get. I think the first block everyone did EXACTLY what we did. But then they caught the bug too. It doesn't matter what machine you have, or how many decorative stitches, you can do it!
I am going to start with one of the filler blocks, Pinwheels.
Now many of you may have done dimensional pinwheels but here are instructions if you haven't
Cut 4 - 2 1/2"squares background fabric
Cut 4 - 2 1/2" squares pinwheel fabric
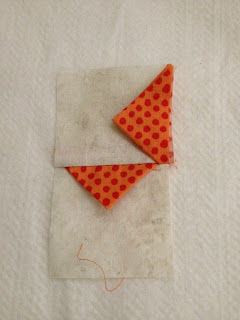
Now take your pinwheel fabric and fold in half from point to point.
Now fold in half again.
Place the pinwheel folded pieces on your background fabric as shown below.
Sew left top square to bottom left square and top right to bottom right.
Sew right and left side together and you will have a completed block!
To reduce bulk in the center of the block, pick a few stitches out of the seam allowance at the center where all squares come together.
You can then fold one seam allowance up and one down dramatically reducing the bulk. You will know this is done correctly of the back forms a small pinwheel in the seam allowances.
Here is the finished block.
Of course I added beads to the center of the pinwheels to add a little bling to the quilt.
Stop back soon as next time we will talk about how we made our Sailboat block.
Subscribe to:
Comments (Atom)


